Building a bicycle wheel
Building your own bicycle wheels for the first time is surprisingly easy. The only difference between a wheel you've built yourself and a wheel from a professional wheel builder is you took longer. Actually, there's another difference: you'll enjoy them more.

"I like to do things the old-fashioned way"
All you need is a rim, some spokes and nipples, and a hub, plus a spoke key and a screwdriver. You feed the spokes through holes in the hub flange, then through holes in the rim, then you tighten them up by turning the nipples. That's all there is to it, but it has to be done in a sequence. The following explains how, step by step, for a 36 spoke front bicycle wheel. There are other ways and other types of wheel, but this method is typical.
Building a bicycle wheel stage 1: spoke lacing
The process of fitting spokes when building a bicycle wheel is known as lacing, presumably because they're passed through holes and then tightened, like shoelaces. As the spokes cross over each other, it could just as easily be called weaving. It isn't - it's lacing.
Throughout the following, the right means viewed from same side of the bicycle as the drive train, and the left means the opposite side, or the side to your left when cycling.
The leading spokes on the right hand side of the wheel
The first thing to note is that the spoke holes in the rim are not on its centreline. They alternate between slightly to the right and slightly to the left. The holes to the right are always used for spokes that come from the right flange of the hub, and vice versa for the left.
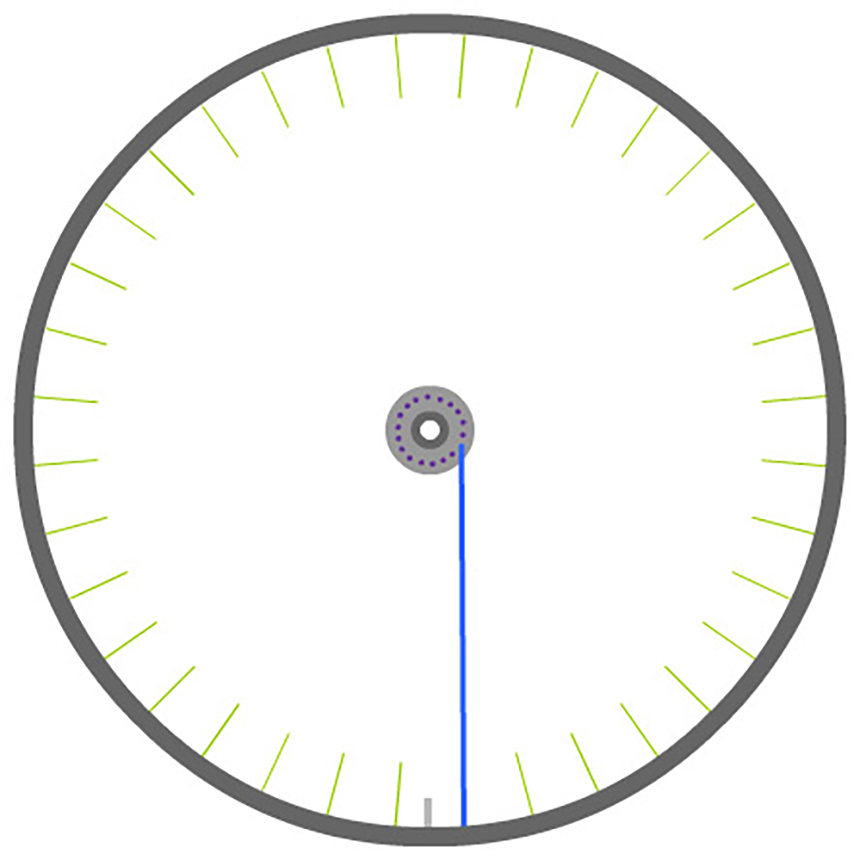
Leading spokes point from the flange in the direction of rotation of the wheel. The first leading spoke to be fitted is known as the key spoke. It comes out of the flange on the outside and goes into the rim at the first hole anti-clockwise from the valve hole. A nipple is then screwed, with a few turns of a screwdriver, onto the end of the spoke where it comes through the outside of the rim.
The key spoke is the same as all the others, except that because it's next to the valve hole and it's a leading spoke, the completed wheel will have parallel spokes on either side of the valve, not crossed ones, giving better access for inflating the tyre.
Click picture to enlarge
The key spoke
The rest of the first 9 leading spokes are fitted in a similar way, coming out of alternate holes in the flange and leaving 3 empty holes between each spoke at the rim.
Click picture to enlarge
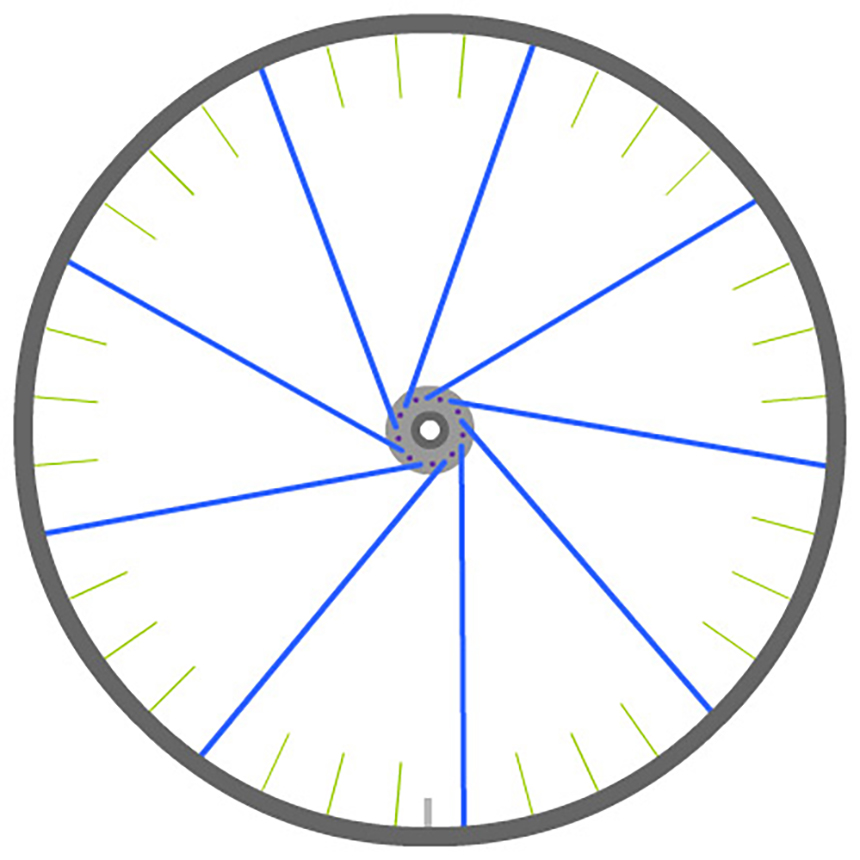
The first 9 leading spokes
The leading spokes on the left hand side of the wheel
The second set of 9 leading spokes (shown in red) is fitted on the left hand side of the wheel, opposite to the first set (shown in blue). At this stage, leading spokes may not look like leading spokes, but they will when you twist the hub anti-clockwise in relation to the rim, as in the diagrams.
Care must be taken to locate the correct starting hole in the left hand flange. The holes in the right and left flanges of the hub aren't quite opposite. They're slightly offset from one side to the other to allow for fact that holes in the rim follow each other round. Looking at the wheel from the right hand side, the correct hole for the first spoke on the left flange is the first one anti-clockwise from the hole with the key spoke on the right flange. Placing a spoke across the flange will help to locate the correct hole.
Click picture to enlarge
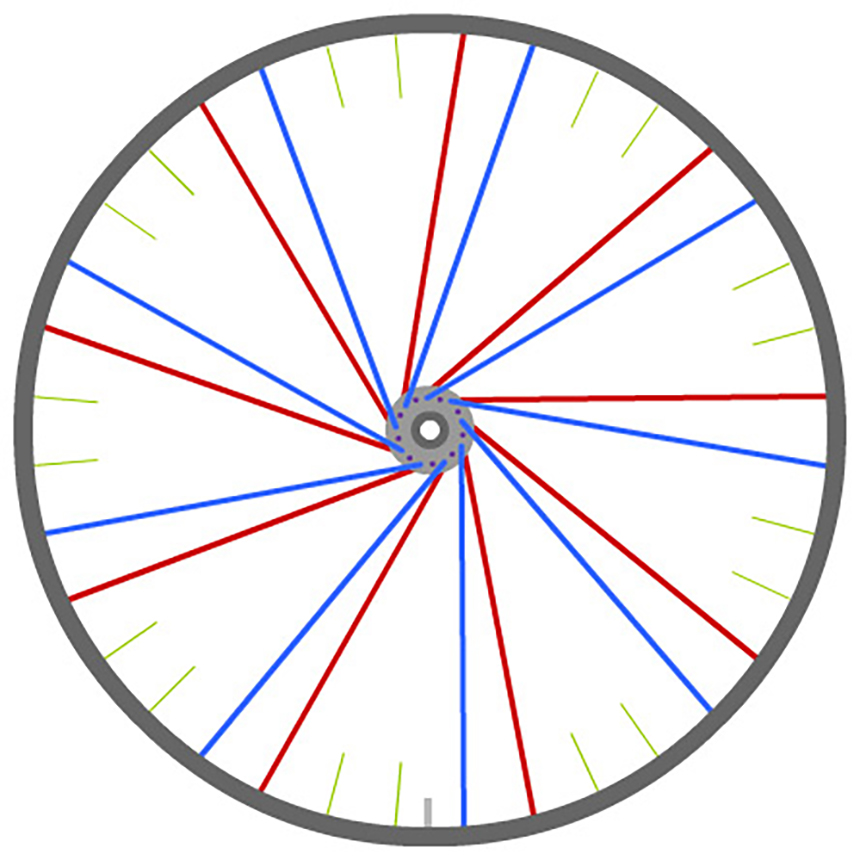
The second 9 leading spokes
The first trailing spoke - right hand side
Trailing spokes point from the flange in the opposite direction to the rotation of the wheel. They appear to 'trail' back from the hub as the bicycle moves forward, and are the spokes that drive it along when it's pedalled.
The first trailing spoke is shown in purple in the diagram (marked with the green arrow). It is fitted on the right hand side of the wheel and comes out of the right flange on the inside from the first hole clockwise from the key spoke. It passes on the inside of 2 leading spokes, then is pulled over a third leading spoke to cross it and pass on its outside (at the red arrow). It goes into the rim at the eleventh hole from the key spoke.
Fitting this spoke will require the hub to be twisted anti-clockwise in relation to the rim, so that all the spokes fitted so far take their leading and trailing positions. Also, it may be easier to screw the nipple on by pushing it through from the outside of the rim and offering the spoke up to it, then screwing the nipple a few turns with a screwdriver to pull it through.
Click picture to enlarge
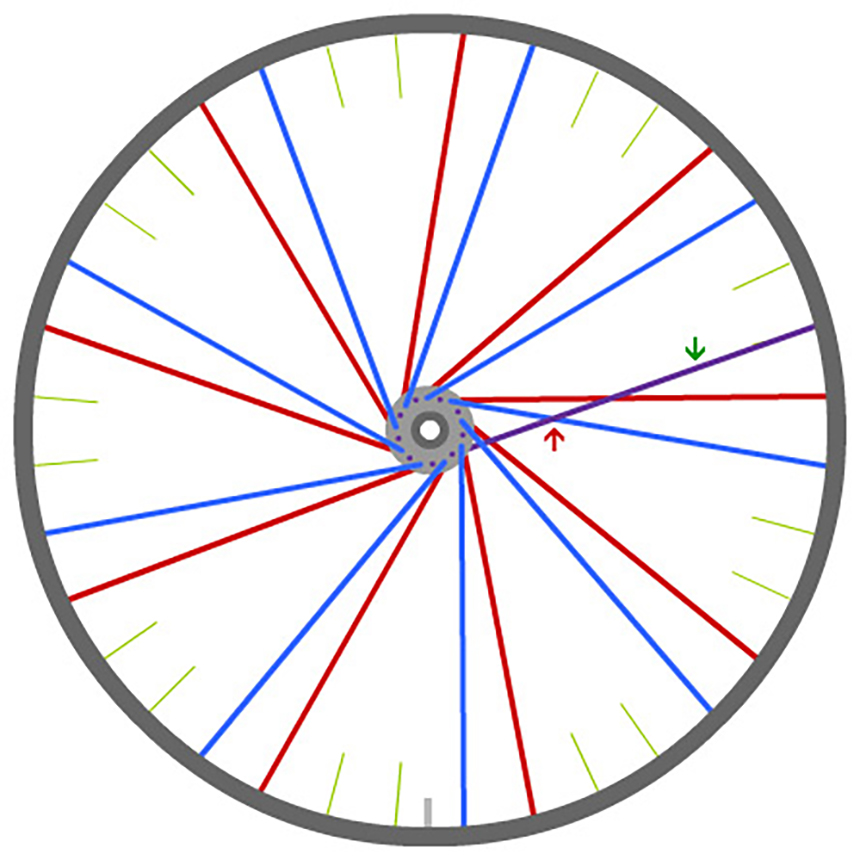
The first trailing spoke
Completing the trailing spokes - right hand side
The rest of the first 9 trailing spokes are fitted in a similar way, all on the right hand side of the wheel and all coming out of the hub flange on the inside, with their heads on the outside. And like the first trailing spoke, they must all be pulled over the third leading spoke they pass, to cross on its outside.
Click picture to enlarge
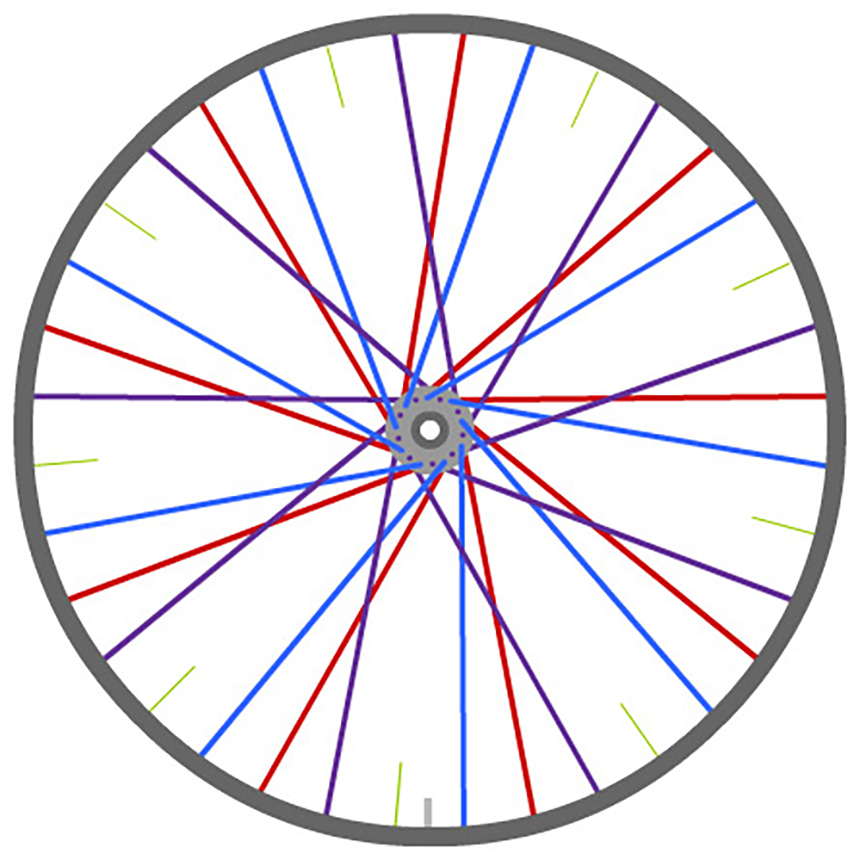
The first 9 trailing spokes
Completing the lacing - the last 9 spokes
These are the trailing spokes on the left hand side of the wheel. They're fitted in a similar way to those on the right, except that they will be a mirror image.
Click picture to enlarge
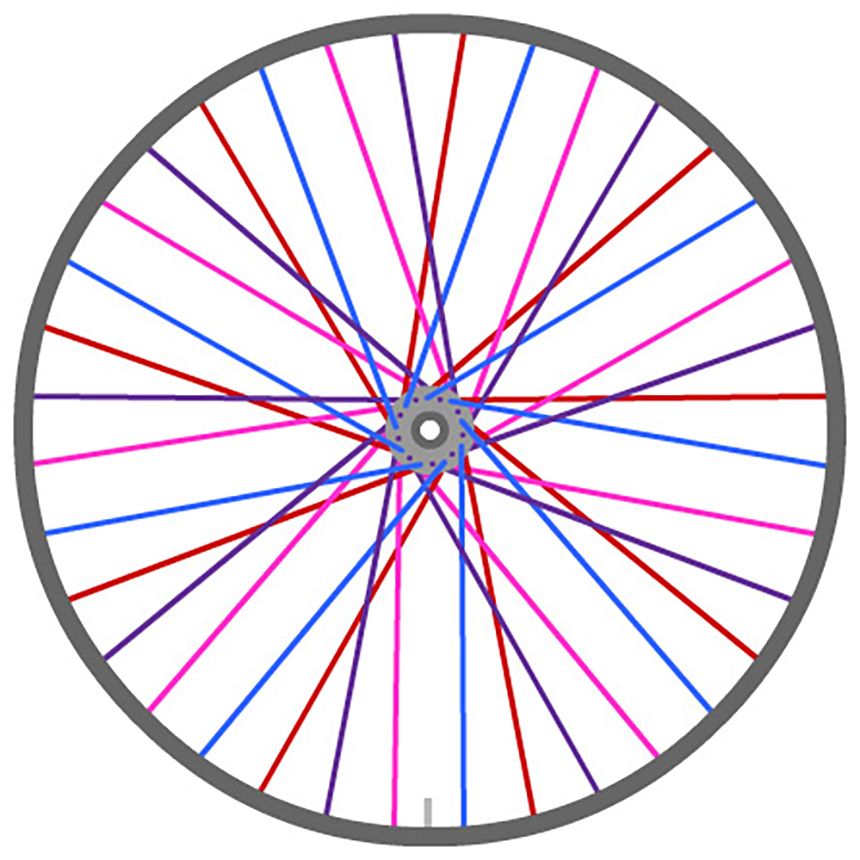
The fully laced wheel
The wheel is now fully laced but the spokes will still be loose and slightly curved. Lacing is completed by tightening up the spokes so they all have roughly the same tension, then pressing them so they sit properly together and bed in to the hub and rim.
First, each nipple is screwed into its recess from the outside of the rim. The quickest way is with an electric screwdriver but an ordinary one will do. They are screwed clockwise to tighten the spokes until their threads just disappear into the nipples and no further. This will pull the spokes fairly straight and make them more even.
Next, the spokes are pressed by hand against the flange of the hub, and grabbed in bunches to squeeze them together - this can also be done with the heels of your feet. The idea is to stress out some of their natural elasticity.
Further tightening is done using a spoke key. I sit in a chair with the wheel placed vertically on the floor, then go round it spoke by spoke on the top curve of the rim, pressing the spoke key upwards against each nipple and turning it. Clockwise tightens the spokes. They can be wound up tight until they all have more or less the same pitch when plucked. Compare the note to another wheel so they're not tightened too much. When it all feels right, stop. On a typical 700c front wheel with butted spokes I stop when their musical note is A (read more on John S. Allen's website).
Building a bicycle wheel stage 2: truing
A newly laced bicycle wheel will not be straight. If you turn your bicycle upside down and put the wheel in the fork, then spin it round, you will see the rim wobble from side to side and most probably up and down too. With care, it can be made perfectly true.
There are all sorts of ways to check the amount of wobble or rise and fall. Some people use a wheel building jig but an upturned bicycle does just as well, and if you have to replace a spoke out on the road you'll already know what to do. You basically need a few reference points close to the rim as it spins. I use the brake pads or a cable tie across the fork, and watch how the gap changes from one part of the rim to another.
Lateral truing
The best place to begin adjusting the rim in a side to side direction is where it seems most out from the rest. Looking at the wheel end on, the rim can be pulled to the right by loosening left-side spokes and tightening right-side spokes in equal measure, working in small turns of the key. Vice versa to pull it to the left. Turn nipples clockwise to tighten and anti-clockwise to loosen. Things begin to happen and you start to believe you'll get your first wheel true.
When you spin the wheel it's easy to see where it's out, but not so easy to pinpoint the spot after it's stopped. This is the key to truing a bicycle wheel: marking the spot, and the limits before and after it on the rim where you need to fade out your adjustments. Small pieces of sticky tape can make it easier. With the wheel stopped, you stick a piece on the inside of the rim where you think a wobble is, then you spin it again and see the wobble and tape go past together in the same place, or if they're not quite together, move the tape a little until they are. Then put other pieces on either side to mark the extent of the adjustment area.
By moving round the wheel and making small adjustments to the places where the rim is most out of true, it will gradually straighten. Continually pluck the spokes as well, to check that there are no 'rogue spokes' more than one musical note away from the others, and that the notes are generally pitched where they should be. When no part of it wobbles more than one millimetre, consider it true enough in the lateral direction for now.
Vertical truing
As with lateral truing, vertical truing is done by observing the rim as the wheel is spun, and correcting 'high spots' by pulling them back in towards the hub, so that the whole of the rim is the same distance from the centre. If you've managed to true it laterally you'll already realise that now, you'll be tightening spokes that lead from both sides of the hub. They'll need more pulling this time, because the spokes to be tightened are pulling directly against their opposite numbers on the far side of the wheel. The spoke key will need relatively more turns to move the rim vertically than laterally.
Again, small pieces of sticky tape are useful as markers - one piece at the high spot and one a couple of spokes or so away in each direction, so that when the wheel is stationary they define the limits of where you're going to tighten spokes. The biggest adjustment - perhaps a full turn of the key - is made at the high spot itself, then moving away, lessening amounts of turn until you reach the outer pieces of tape.
If you've put a cable tie across the fork as a reference point, it can be moved slightly, to bring it closer to the outside of the spinning rim as it becomes truer. When the gap between the rim and the tie doesn't vary by more than one millimetre, the wheel is true enough in the vertical direction.
Bicycle wheel dishing
Dishing refers to the fact that the spokes on a bicycle wheel never run vertically between the rim and the hub. When the wheel is laid flat on the ground, the lowermost 18 spokes form the shape of a 'dish' and the uppermost form the shape of an upturned dish. The dishing on the front wheel is symmetrical because all the spokes are the same length. A rear wheel needs to accommodate the sprockets on one side, so the dishing on the sprocket side is less, achieved by using slightly shorter spokes.
It can be checked with a dishing tool, or the laced wheel can be placed in the fork one way, then the other, during the truing process. Dishing is adjusted by equally tightening (or loosening) all the spokes on one side. In theory the lateral and vertical trueness of the wheel should not be affected, but in practice you reach a stage where each aspect of truing the wheel is finally checked in conjunction with the others, and you continually pluck all the spokes to check their tension.
Stressing and seating
Anyone who has tuned a guitar or violin will know that newly tuned strings soon slacken a little and the instrument has to be re-tuned. This tendency can be reduced by yanking the strings out with a finger to 'pre-stretch' them beyond their natural tuned tension. Bicycle wheel spokes are the same. When a wheel is ridden on after truing, the weight of the rider and the pull of the chain will tend to stretch the spokes a little bit more, and pull them even straighter where they seat against the flange of the hub and where they cross each other. This may cause the wheel to go slightly out of true again.
This can be prevented by a process called stress relieving, whereby groups of spokes are grabbed in a leather gloved hand and squeezed together as hard as possible. Another method is to place the wheel on the ground and press hard on the spokes with the heel of your foot. Either way, the aim is the same as with a newly tuned guitar string: to 'pre-stretch' the spokes so that they will not stretch any further when the bicycle is ridden.
After this, the wheel will probably need a bit more truing, then it should be ready for the tyre, and of course the road.
The bicycle rear wheel
As noted above, the spokes on the right hand 'drive' side of a rear wheel are slightly shorter than those on the left. If they are the correct length, building a rear wheel should be almost as easy as building a front one, except that plucking the right side spokes will produce a higher pitched note, and particular care is required to achieve the correct degree of reduced dishing to accommodate the freewheel and sprockets.
Caveats:
The lacing method described, with leading spokes coming out of the hub flange on the outside (outbound) and trailing spokes coming out on the inside (inbound), can be reversed, so that the trailing spokes on the rear wheel (the ones that power the bicycle forward when it's pedalled) come out on the outside.
The theoretical argument for this is that rear wheel trailing spokes are put in tension as they 'pull' the bike along, and if they are outbound at the flange they will tend to press against it instead of tending to pull on the spoke heads. Conversely, if the trailing spokes are inbound (as described), as they tend to straighten inwards under tension, they will pull away from the jockey cage on the rear mech instead of towards it.
As long as the spokes are correctly tensioned it doesn't matter whether trailing spokes are inbound or outbound, so take your pick, depending on which theory you prefer.
This article assumes you have suitable rims, spokes, nipples, and hubs. Your local bike shop should be able to advise you on obtaining properly matching components, including spokes of the correct type and length.
There are many different types of bicycle wheel and methods of lacing. This article refers to a standard 36 spoke wheel in a conventional lacing pattern.
I don't hold myself out as an expert on building bicycle wheels. The method described is simply the one I've used on my own bicycles and may (or may not) be helpful. It works for me and none of the wheels I've built myself have required adjustment after several thousand miles of cycling.
Articles »